


3. Propagation
By S. Roger Horman
Pitcher plants thrive in sunlit bogs, where the soil is constantly moist, acidic and contains few nutrients. Propagation from seed is best performed with these factors in mind. The process described below includes:
- When to plant
- Separation of seeds from their pods,
- Measuring the right number of seeds to plant by counting, weighing or volume,
- Making the planting mix,
- Filling the pots,
- Planting the seeds,
- Making and installing protective tents for the pots,
- Providing constant moisture, and
- Repotting the plants when this is needed.
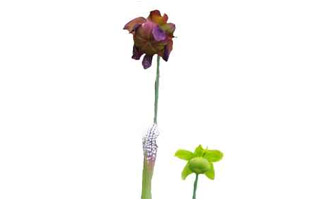
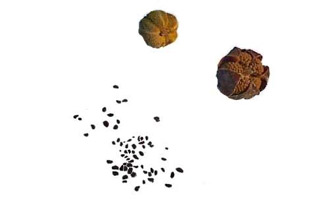
Pitcher plant seeds are formed in the 5-carpellate ovaries of the flowers. The structure of the flower, as shown below in figure 2(a), maintains this five-fold symmetry, and shields the ovary during much of its development behind a highly modified umbrella-like style. When the ovary has matured, it will become dry and take on a tan to reddish brown color, figure 2(b). The number of seeds per ovary is highly variable, ranging from a few to hundreds. The size of the seeds is also highly variable between species and from different plants within species due to environmental factors and maturity of the parent plant.
When the capsule has dried completely, the ovaries are ready for harvesting. To prevent loss of seeds, they can be cut while still green in late August. Frequently, the ovaries will split open like the lower one in figure 2(b), but some will remain tightly sealed like the upper capsule in that figure. The seeds are easy to remove from the ovary with the fingers aided by a dental pick. Because it is easy to confuse debris from the ovary with the seeds, it is best to try to remove the seeds without crushing and scattering the ovaries. A dental pick or a very small brush can be used to remove debris from the seeds. This can be tedious with a large volume of seeds, therefore it is recommended that only a single ovary be processed at a time and clean seeds be removed from the work area and stored in a vial or bottle with a top. The seeds should be stored in paper envelopes in a cool place such as a refrigerator.
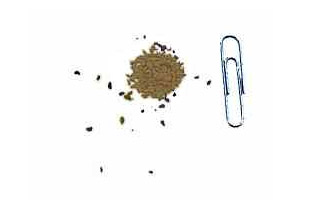
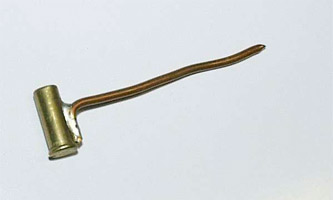
The best time to plant is in mid winter. Planting of the seeds is best done in pots with a nominal volume of 1 gallon. Although there is no set rule about the number of seeds to be planted in each pot, 100 seeds seems to work out well. This is actually a small volume of seeds, as can be seen in figure 1. If you do not intend to measure germination and survival rates, you can approximate 100 seeds by measuring the weight or volume of a small volume of seeds, count the seeds measured, using a dental pick or a small brush, and then use this information to approximate 100 seeds. For example, figure 3 shows a scoop fabricated from a previously fired .22 caliber long rifle casing and wire. It tended to contain approximately 150 Sarracenia flava seeds on several trials. Remember, the size of seeds is highly variable, so do not assume that this scoop will even approximate the count that you will get with your seeds. If you want to measure germination rates, there is no way around counting the seeds.
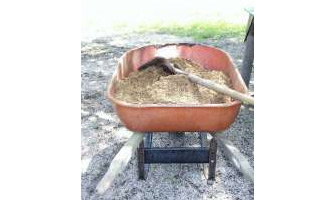
The planting mixture for virtually all North American pitcher plant seeds is an even mixture (by volume) of masonry sand and peat moss. The best way to mix large volumes of peat moss and sand is in a wheel barrow or on the ground. The two materials should be mixed well, as if you were mixing concrete. Add water as you mix and thoroughly hydrate the peat to the point that you can squeeze the soil and see water, but not to the point that you can make the soil a soup. If the pots are used, it is recommended that they be sterilized by washing with bleach and detergent, followed by thorough rinsing and air drying.
When completed, the mixture should appear uniform as in the case of figure 4.
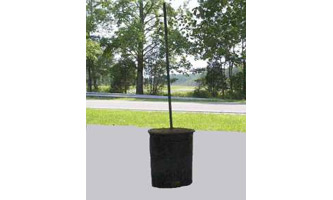
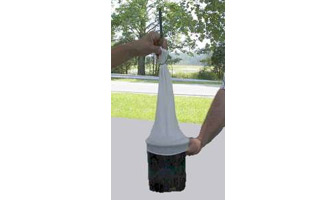
Next, pine needles should be pressed into the bottom of the pot until the compressed needles completely cover the drainage holes plus a quarter of an inch (about 5-10 mm). The purpose of the pine needles is to prevent loss of the planting mix through the drain holes in the pots. This loss in turn can lead to slumping of the mix in the pots and damage or loss of plants. We have also used a double thickness of institutional coffee filters, which works well at first, but which frequently rots and fails. The pine needles last well and do a good job of retaining the planting mix. Add the planting mixture to each pot being careful to press the mixture in firmly to avoid voids in the mix. The soil level should be approximately one quarter to one half inch from the top of the pot. Insert an 18 inch (approximately 45 cm) long stake firmly into the pot, taking care that the stake is vertical (see figure 5.) Afterwards, take care to press the mixture surface such that it is as flat and level as possible. Next gently tap the seeds from the seed container as evenly as possible over the entire surface of the mixture in the pot. Do not bury them or water them on top. The seeds are very hydrophobic and direct surface watering will result in the seeds floating away. Handling of the seeds with fingers or other tools may also result in the unwanted transfer of seeds to other experimental pots. Do not bury them. A tent of unwoven fabric or the tubular cloth covering made for drain tile (see http://www.carriff.com) will protect the seeds and seedlings from most of the negative effects of rain and adverse weather, as well as provide some protection from large insects.We make ours approximately 13 inches (33 cm) high, and attach the top to the stake with a "twist tie" and, if tents of unwoven fabric are used, the bottom to the pot with rubber bands. The rubber bands will degrade in sunlight, but normally will remain effective until the seedlings are ready to live without the protection of the tent, about 6-9 months (figures 6 and 7.) The tubular cloth tents have an elastic nature, which allows them to be used without the rubber bands.
The pots should be placed snugly together in a flooded bed with water maintained at a constant level of about 1/3rd to 1/2 pot height. We have found that an automatic watering system, coupled with a drain the height of which determines the water depth, prevents accidents such as letting the pots dry out. Since drying is frequently fatal to the seedlings, care must be taken to check the water depth on a regular basis, even if an automatic watering system is used. Reference to the Potomac Elementary School (Dahlgren, VA) site will provide photographs of such a flooded bed and watering system.
One of the most efficient ways to break dormancy in the seeds and prepare them for germination is to sow them on the surface of the prepared pots in mid-winter. Once the seeds are sown, the tents are placed over the pot, and the whole assembly is placed outside in the tank of water maintained at 1/3rd to 1/2 pot height. The freezing and thawing which occurs over the winter months breaks dormancy in the seed and the tent prevents seed loss. Furthermore, since the seeds have already been sown in the pot they can then germinate and grow in the spring under the protected conditions provided by the tent. Pitcher plant seeds typically germinate outside during May in the mid-Atlantic states. The tents will prevent damage to the tender seedlings from severe storm events during the summer months. Tents may then be removed in mid to late summer.
If one desires to germinate pitcher plant seeds and raise seedlings indoors under lights during the winter, the following changes may be made. After one month of freezing and thawing bring the pots inside. Place the pots in water maintained at 1/3 the height of the pot. Cool white flourescent lights, with an 18 hour photoperiod, may then be placed 10cm from the top of the pot. Germination will begin within two to three weeks. Instructions for building light stands are provided on the Potomac Elementary School web site.
Depending on the quality of the seeds and the water used, germination rates from 1% to 84% can be expected. Because most of the water consumed by the evaporation from the pot comes from the base and not the top, hard water can cause a build-up of toxic minerals called caliche. Caliche formation can be avoided by use of soft water, distilled water or rainwater. However, unless you are growing a small number of pots, the amount of water consumed during the summer months in a climate like that of Virginia will require more water than can normally be collected in a rain barrel.
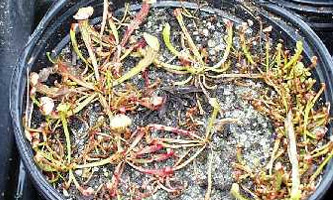
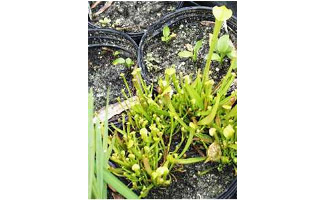
The seeds will germinate in 3-8 weeks after the last thaw, but will have very short roots. This is the main reason why the use of tents is critical. The young sprouts are easily dislodged and moved, even to the point of being knocked out of the pot, by rain drops which hit them directly. The sprouts will look like very tiny pitcher plants from the beginning. If weed seeds were in your sand or peat moss you will see a very prompt and healthy germination of them as well. Take care when pulling weeds, but normally there will be no question of the difference between them and the little pitcher plants. If weeds are allowed to get too tall, their root structure is usually extensive compared to that of the pitcher plants. This will require a careful touch to tease the weeds out of the mix without dislodging the pitcher plants. Figure 8 shows what a pot of pitchers looks like about one year after germination, when grown outside in soft well water.
It is possible to force the growth of pitcher plants indoors during winter through use of fluorescent lighting in a heated room. Reference to the Potomac Elementary School Website, devoted to work performed with the assistance of grants from Toyota, the National Science Teachers Association and Virginia Power, will provide detailed information concerning how to make light tables and show the dramatic growth possible through this forced growth. It is important to allow the seedlings to go dormant for a few weeks prior to bringing them inside.
Regardless of the method by which the seedlings are raised, outdoors or forced inside under lights, the time to transplant small seedlings from crowded pots is in early Spring. We do not recommend transplanting seedlings in the Fall. Fall transplant of seedlings results in a greater likelihood of mortality due to freezing effects on the poorly rooted plants.Disturb the roots as little as possible. If it is possible to remove the plant and a core of soil containing all its roots, this is recommended. If you are transplanting a large number, either transplant them one at a time or place the seedlings in water to avoid desiccation until they are ready to plant.
It generally takes 5-7 years from planting of a seed until the plant reaches sexual maturity and blooms. This can be somewhat accelerated by ideal growing conditions and/or a winter of forced growth under lights. Continued forced growth beyond a year is frequently detrimental, so it should be viewed as a means to get the plants to a size and state where they will be more likely to survive on their own.
The plants in figures 8 (a) and 8 (b) are hybrids, which can be beautiful and surprising in your gardens. You should not plant hybrids into the wild, nor plant known species into the wild except into areas of their current or historic range. This is important to prevent any further deterioration of pitcher plant stands in the wild and to avoid competition with attempts to restore threatened and endangered plants to their historic ranges.